 Main
Main Site Map
 Blog
Blog Calendar
 Gallery
 Site Traffic
 Site Health
> /Daniel/MRoadster/Upgrades/Suspension/SubframeBushingshowto.php
Tools
- floor jack
- jackstands (preferably 4)
- SIR Tools Bushing Master Kit (BMW3026 from ZDMAK).
- Torque wrench
- 24mm GearWrench
- 24mm deep impact socket (optional)
- 16mm SK crowfoot flare
- 16mm GearWrench
- 6mm (?) allen for subframe mount support brackets
- rubber mallet
- various combination wrenches and sockets
Reference Diagram
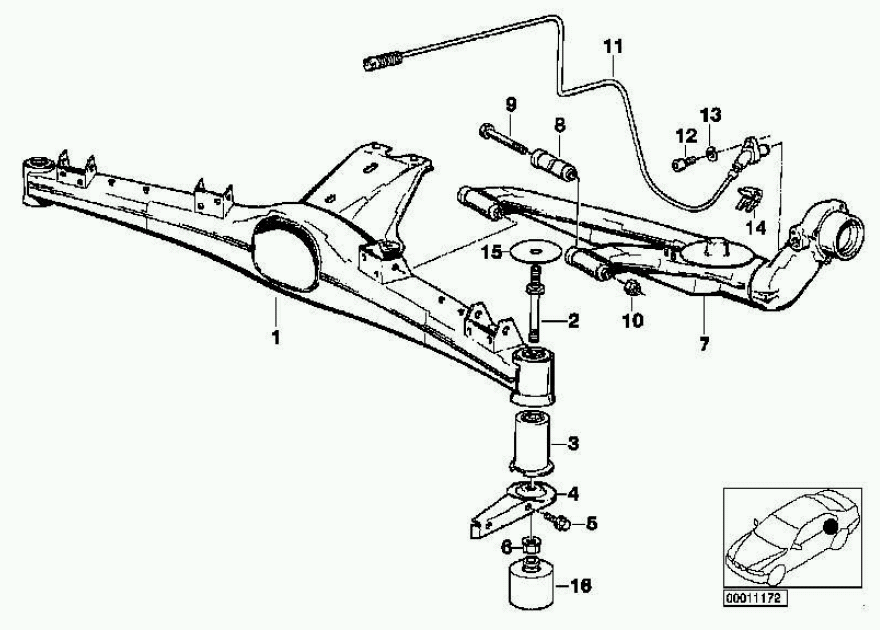
| 1 | rear subframe |
| 2 | subframe mounting stud |
| 3 | rear subframe bushing |
| 4 | rear subframe mount support bracket |
| 7 | rear trailing arm |
Removing the stock subframe bushings
-
Break loose rear wheel lugnuts. These are 17mm.
Jack up rear of the car, put on jackstands at the jack points. The higher the better. If you haven't jacked up your car before, be forewarned... it's fairly easy to damage your car if you don't know what you're doing. You could also hurt yourself. Having said that, I normally jack up the rear by the subframe using the crossbeam adapter for my AC Hydraulics DK13HLQ floor jack. If not using a crossbeam adapter, you can jack up the car by the body of the differential (in front of the differential cover). DO NOT LIFT THE CAR BY THE DIFFERENTIAL COVER!
Remove rear wheels.
Remove exhaust.
Pop brake lines and sensors from their guides (including the sensor connection holders in the subframe). No need to disconnect them.
Disconnect speed sensor from differential cover.
Remove heat shield fasteners to permit driveshaft lowering.
Remove swaybar from its mounts to the chassis.
While supporting trailing arm with jack, disconnect driver side rear shock at bottom. Slowly lower the trailing arm onto a jack stand.
While supporting trailing arm with jack, disconnect passenger side rear shock at bottom. Slowly lower the trailing arm onto a jackstand.
Number the bolts and their corresponding holes where the driveshaft connects to the differential. You want the same bolts back in the same holes when you reconnect. If you're not color blind, 4 colors of sharpie works great.
Disconnect driveshaft from differential (the 4 bolts you numbered or color-coded). A 16mm GearWrench works well here.
Support differential and subframe with floor jack. You want a pretty good guess about the center of gravity here, but somewhere on the differential body close to the differential cover is good. DO NOT USE THE DIFFERENTIAL COVER TO SUPPORT WEIGHT!
Remove the subframe mounting nuts. If you have a Butt-Strut, you'll be removing it at the same time (same fasteners).
Remove the subframe mount support brackets. I think these were 6mm allen, and you'll want a bit for them to use with the socket wrench (torque wrench when you reattach).
Now the only thing holding the subframe up is the jack and the differential cover mount. Remove the mounting bolt from the differential cover. You may need to lower or raise the jack very slightly to get the differential at the right height so you can easily pull the bolt out.
Lower the jack an inch or so. Start tapping the subframe downward near the mounting points. A rubber mallet lightly tapping on the trailing arms close to the subframe works fine. Work slowly, inching each side down a little at a time to prevent binding the subframe on the mounting studs. Once the subframe stops moving, lower the jack another inch. Repeat until the subframe comes off of the mounting studs. Keep an eye on your driveshaft at each point. If you've got jackstands that will work, support the rear trailing arms while doing this and remove your rear springs when they come free. This is a good opportunity to clean the spring pads and trailing arms, as well as underneath the spring pads.
The following picture shows the bushing just barely off of the mounting stud.
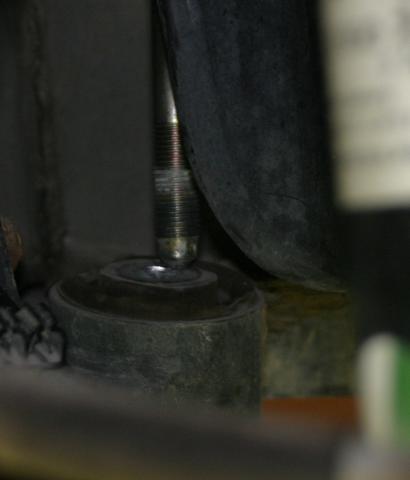
Once the subframe is off of the studs, lower it a little bit more, until you can get the top part of the bushing removal tool on top of the subframe bushing. At this point the subframe is probably hanging on the driveshaft, which is hanging on the heat shield you loosened (but did not remove). If you're careful, your driveshaft will stay in alignment and go right back into position when you raise the subframe up again. The jack is supporting most of the weight, along with the jackstands holding the trailing arms.
Put the top of the bushing removal tool on top of the driver side subframe bushing. Make sure the grooves in the side of the tool line up with the dimples in the subframe. Stack the adapter, the receiving cup and the pressure plate of the bushing removal tool, and insert the threaded rod with the thrust bearing against the pressure plate. The adapter is designed to fit on the bottom of the subframe in one way, and one way only. It has tabs that fit into notches in the subframe. Put the whole assembly in position and put the threaded rod through the subframe bushing and thread it into the top part of the bushing removal tool. You're now ready to remove the subframe bushing.
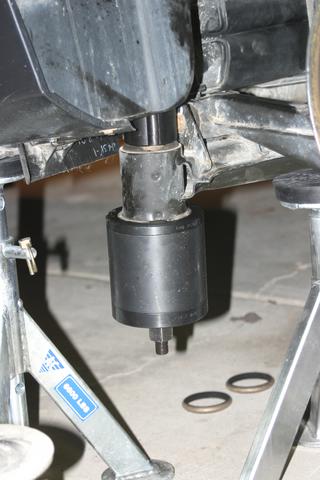
Tighten the thrust nut on the bottom of the bushing removal tool, and keep going until the bushing is almost all the way out. A 24mm GearWrench work well here, you'll be doing a lot of turning. A deep 24mm impact socket will work too, with the impact wrench. However, the thrust nut may move up on the threaded rod beyond the reach of the socket, so you'll want the 24mm GearWrench handy anyway. While turning, make sure the grooves in the top part of the bushing removal tool remain aligned with the dimples in the subframe.
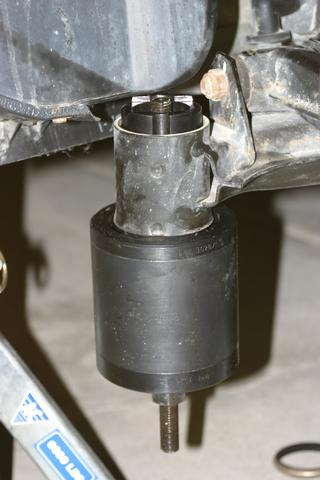
If you wait a few seconds between turns, the job will be less work. The bushing will creep, making the next turn easier.
Go slowly at the end and be prepared to catch everything. The bushing will go into the receiving cup of the tool and the whole thing (tool and bushing) will come out the bottom of the subframe as one piece.
Remove the other bushing in the same manner.
Installing the Ireland Engineering subframe bushings
-
Once the stock bushings are out, you're in the home stretch.
If you removed your springs, put them back at this time.
Put the top of the Ireland bushings in the subframe. Slowly raise the subframe back into position, carefully watching that the driveshaft goes back into position on the differential. Also make sure your swaybar is going roughly into position.
Put the differential cover mounting bolt back into place, with the nut snugly threaded on (do not torque yet).
Put the bottom halves of the Ireland bushings in the subframe, on the mounting studs. You may need to wiggle the subframe a little bit while doing this, or tap them in the last half inch or so using a long socket and a rubber mallet. Don't hammer on the urethane, you want to use a long socket to tap on the metal sleeve in the bushing, not the urethane.
Install the subframe mount support brackets. Torque to specification (24 Nm on my car).
Install the subframe mounting nuts. Tighten snugly, but do not fully torque yet. You basically want to get these tightened to the point where you feel the urethane compression stop because the metal inner sleeve has contacted metal on both ends. you could torque to spec now, but it's a lot of force to put on the fasteners while your car is on jackstands. I prefer to torque these to spec with the car on the floor just for safety reasons.
Reattach the driveshaft. Torque to specification (64 Nm on my car). You need to put the car in gear while tightening (handbrake isn't a bad idea either), but take it out of gear to rotate the driveshaft so you can get at each fastener. You'll need the 16mm crowfoot again here.
Install the heat shield fasteners you removed to let the driveshaft be lowered.
Torque the differential cover mounting bolt to specification (77 Nm on my car).
You can now use the floor jack to support each trailing arm in turn, to reattach the bottom of the shocks. I normally just make these bolts snug at this point, and torque them to specification with the suspension loaded (car back on the ground).
Install the swaybar in its mounts, torque to specification (22 Nm?)
Put the brake lines and sensor wires back in their guides.
Reconnect the speed sensor in the differential cover.
Install the exhaust.
Put the rear wheels on, lugbolts snug but not fully torqued.
Jack the rear up by the differential body and remove the jackstands. Lower the car slowly to the floor.
Torque the subframe mounting nuts to specification (140Nm on my car).
Torque the shock mounting bolts to specification (77 Nm on my car).
Torque the lugbolts to specification.